7 Best Budget (Cheapest) Golf Simulators of 2023

Ever wished you could play more golf without spending a fortune on greens fees or driving range buckets? Well, you’re in luck because we’re diving into the world of budget-friendly (cheapest) golf simulators. These nifty devices let you practice your swing and enjoy a virtual round of golf from the comfort of your own home.
In this guide, we’ll keep it real and show you how to get the most bang for your buck. We’ll chat about why affordable golf simulators are worth your attention, check out the different types you can snag, and provide insight on what to look for when shopping on a budget. Plus, we’ll even explore some DIY setup options if you’re feeling crafty.
So, if you’re ready to hit the virtual links without draining your bank account, let’s take a look at the 7 best cheapest golf simulators.
What is the Best Cheapest Golf Simulator?
1. OptiShot 2 Golf-In-A-Box Simulator Package ($799)

Overview.
The OptiShot 2 Golf-In-A-Box Simulator Package is one of the best golf simulators on the market.
It includes the OptiShot 2 launch monitor, which is known for its accuracy and reliability.
The OptiShot 2 Golf Simulator for Home features an optical swing pad with 16 infrared sensors, which enables it to measure things like clubhead speed, swing path, face angle, and distance.
Pros:
- Accurate golf simulator
- Reliable
- comes with E6 Connect software
Cons:
- Requires a lot of space
- Can be expensive to upgrade to more advanced features
2. Garmin Approach R10 Launch Monitor ($599)
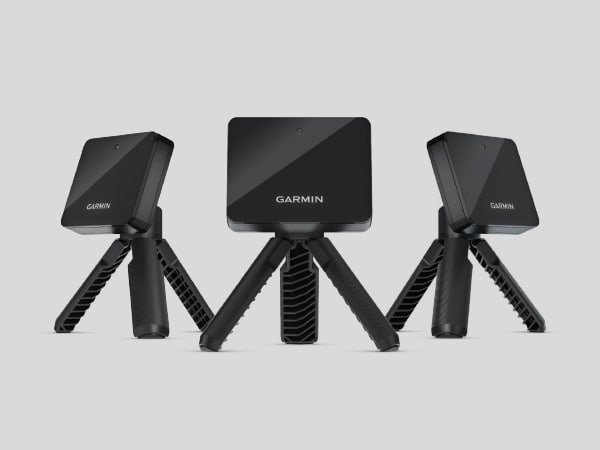
Overview.
The Garmin Approach R10 Launch Monitor is a compact and portable launch monitor that can be used with any smartphone or tablet.
Tracking data is compromised of the following, which rivals some of the $1k-2k launch monitors on the market and uses radar technology but at under $600, it’s a much more affordable golf simulator.
By using the Garmin app and an impact screen, you can experience everything a multiple thousand-dollar SkyTrak can do.
Pros:
- Compact
- Portable
- Most accurate golf simulator
- Provides detailed feedback
Cons:
- No built-in simulator software
- Requires an app or third-party software
Related article: Garmin Approach R10 Review: Practice On The Go
3. SwingLogic SLX MicroSim Home Golf Simulator ($170)

Overview.
The SwingLogic SLX MicroSim Home Golf Simulator is a very compact and affordable golf simulator.
The SLX MicroSim isn’t designed to use any balls and it comes with a toy stick for swinging, although you can swing your own clubs with foam or real balls if you want.
This golf simulator is child and beginner friendly. We recommend it for recreational golfers.
Pros:
- Very compact and affordable
- Easy to use
Cons:
- Not as accurate as some other simulators
- Limited features
4. TruGolf Mini Golf Simulator ($249)
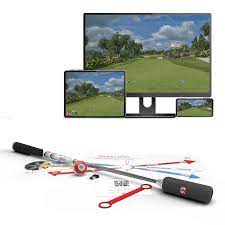
Overview.
The TruGolf Mini Golf Simulator is another very compact and affordable golf simulator.
Similar to the SLX MicroSim above, uses a shortened swing stick with attached sensor to simulate play.
The E6 CONNECT software is packed with features that are sure to keep you busy for hundreds of hours.
These include full course play, practice, PinSeeker, and various kid-friendly games like Carnival, Battle Stations, and Demolition Driving Range.
Pros:
- Very compact and affordable
- Easy to use
Cons:
- Not as accurate as some other simulators
- Limited features
5. Rapsodo MLM2PRO Launch Monitor ($699)
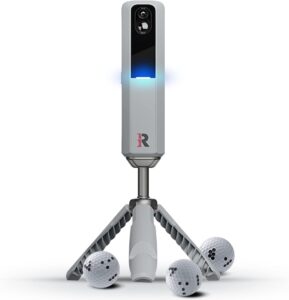
Overview.
The Rapsodo MLM2PRO Launch Monitor is a portable launch monitor that offers a wide range of features.
On your phone after a swing, you’ll find a simulated ball flight with clubhead speed, distance, and much more showing.
This makes it great for improving your range sessions, and it does so for a very affordable price.
Pros:
- Portable
- Offers a wide range of features
- Very accurate
Cons:
- Expensive
6. Swing Caddie SC4 Launch Monitor ($550)

Overview.
The Swing Caddie SC4 Launch Monitor is a very affordable launch monitor that offers a variety of features.
What makes the SC4 so unique and valuable is that while it has an onboard display that allows you to get your numbers without any software, it also supports golf simulation.
This is a combination that you really only see in the expensive high-end units.
Pros:
- Very affordable
- Offers a variety of features
Cons:
- Accuracy
7. SMARTGOLF AI Golf Simulator ($300)
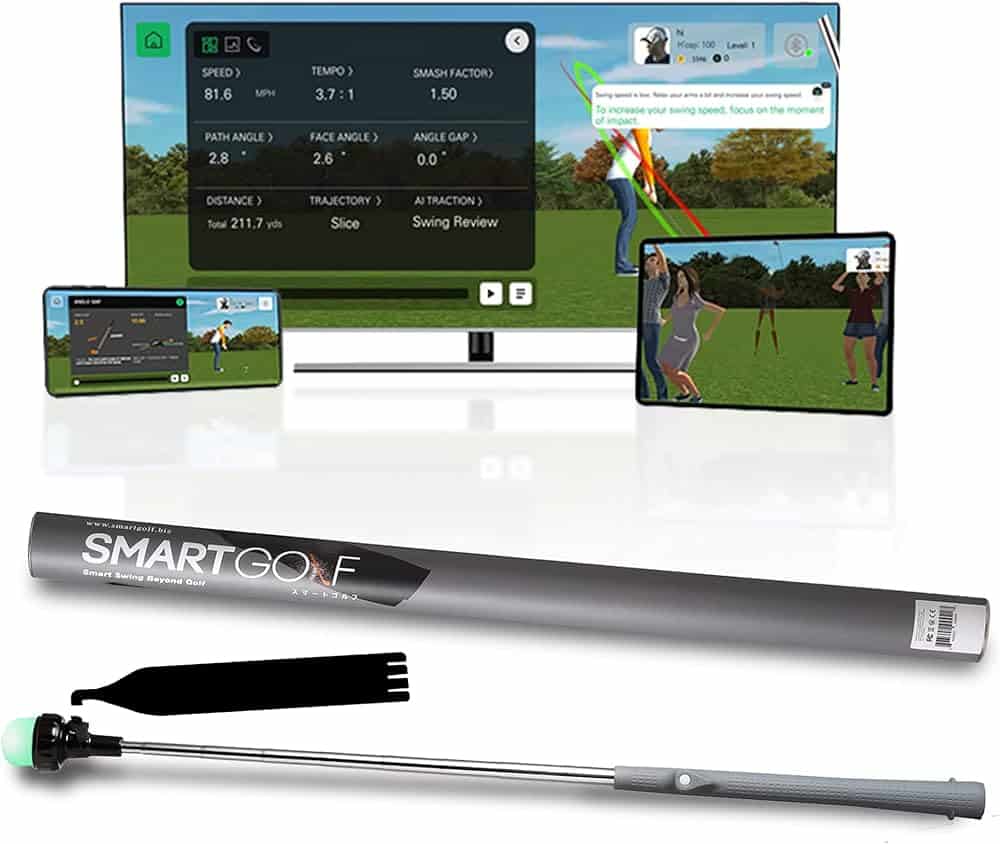
Overview.
The SMARTGOLF AI Golf Simulator is a unique golf simulator that uses artificial intelligence to track your swing mechanics and ball flight.
Experience the precision of AI-powered swing analysis, lifelike courses, and endless practice options.
From beginners to pros, it’s your personal golf coach and playground, rain or shine.
Play iconic courses, challenge friends worldwide, and improve your skills like never before.
With easy setup and continuous updates, SMARTGOLF is your ticket to golfing greatness.
Pros:
- Unique,
- Uses artificial intelligence to track your swing mechanics and ball flight
- Very accurate
Cons:
- Limited features
- Can be expensive to upgrade to more advanced features
Why Choose a Budget-Friendly Golf Simulator?
When it comes to selecting a golf simulator, you might be tempted by the allure of high-end, feature-packed models. However, choosing a budget-friendly golf simulator has its own set of advantages that can make it the perfect choice for many golfers:
Cost Savings
One of the most compelling reasons to opt for a budget-friendly golf simulator is, of course, the significant cost savings.
High-end simulators can come with a hefty price tag, while budget options allow you to enjoy the benefits of virtual golf without emptying your wallet. You’ll get more bang for your buck.
Accessibility for Beginners
Budget-friendly golf simulators are often more accessible to beginners who may not want to invest heavily in a hobby they’re just starting to explore.
These simulators provide an affordable entry point into the world of golf simulation, allowing newcomers to test the waters without financial stress.
Recreational Enjoyment
If you’re a recreational golfer who enjoys the occasional round with friends or family, a budget simulator can provide plenty of fun and entertainment.
You don’t need all the bells and whistles of high-end models to have a great time. These simulators cater to your desire for golfing enjoyment without making it a serious investment.
Upgradable Options
Many budget-friendly simulators offer room for upgrades. You can start with a basic setup and gradually enhance it as your interest and skills grow.
This incremental approach ensures you’re investing wisely based on your evolving needs and preferences.
Choosing a budget-friendly golf simulator offers cost-effective access to the world of virtual golf, making it an ideal choice for beginners, recreational golfers, and anyone looking to enjoy the game without breaking the bank. So, whether you’re teeing off for the first time or aiming to improve your swing, budget-friendly options can help you get started on the right foot.
Types of Affordable Golf Simulators
In the world of budget-friendly golf simulators, there is a diverse range of options to choose from. Understanding the different types and their respective pros and cons can help you make an informed decision about the best fit for your needs. Here are the main types of affordable golf simulators available in the market:
Screen-Based Simulators:
Pros:
- Affordable: Screen-based simulators are generally more budget-friendly compared to other types.
- Compact: They typically don’t require a large dedicated space, making them suitable for home use.
- Ease of Setup: Setting up a screen-based simulator is relatively straightforward.
Cons:
- Limited Realism: These simulators might not offer the same level of realism as more expensive options.
- Space Constraints: While they are compact, you may still need a dedicated space for the screen and hitting area.
Projector-Based Simulators:
Pros:
- Enhanced Realism: Projector-based simulators often provide a more immersive experience with a larger projection screen.
- Accuracy: They can offer more accurate ball flight and shot data analysis.
- Room for Improvement: You can upgrade the components gradually for an even better experience.
Cons:
- Cost: Projector-based simulators can be pricier than screen-based options, although still more affordable than high-end models.
- Space Requirements: A larger space is typically needed to accommodate the projection screen and hitting area.
Portable Simulators:
Pros:
- Portability: These simulators are easy to set up and can be moved around, making them suitable for those with limited space.
- Affordability: Portable options are often budget-friendly and provide a cost-effective way to enjoy golf simulation.
Cons:
- Limited Realism: While portable simulators can offer a fun golf experience, they may not match the realism of larger, more permanent setups.
- Space and Accuracy Trade-offs: Smaller setups may sacrifice some accuracy and data tracking capabilities.
Pop-Up Nets and Mats:
Pros:
- Extreme Portability: Pop-up nets and mats are incredibly easy to set up and can be used both indoors and outdoors.
- Affordability: They are among the most budget-friendly options for practicing your swing.
Cons:
- Limited Simulation: These setups are primarily designed for swing practice and may not offer full golf simulation experiences.
- Minimal Shot Data: You may not receive as much shot data feedback compared to more advanced simulators.
In conclusion, there are various types of affordable golf simulators, each with its own set of advantages and limitations. The choice largely depends on your budget, available space, and desired level of realism. Understanding these differences will help you select the right budget-friendly golf simulator that suits your needs and preferences.
Key Features to Look for in a Low-Cost Golf Simulator
When shopping for a low-cost golf simulator, it’s important to identify key features that can enhance your experience without straining your budget. Here are essential features to consider, along with explanations of why they matter for improving your game:
1. Swing Analysis:
- Why it Matters: Swing analysis provides crucial insights into your golf swing mechanics, helping you identify areas for improvement. Look for a simulator that offers feedback on clubhead speed, angle of attack, and swing path. This information enables you to refine your technique, resulting in more consistent and accurate shots.
2. Course Selection:
- Why it Matters: A diverse selection of virtual golf courses allows you to practice on a variety of terrains and challenges. This variety keeps your practice sessions engaging and helps you adapt to different course conditions, improving your adaptability and overall golf skills.
3. Shot Accuracy:
- Why it Matters: Accuracy in shot measurement ensures that your simulator provides realistic ball flight data. The more accurate the simulator, the better it can replicate real-world conditions. This means your practice will translate more effectively to the golf course, helping you fine-tune your shots for actual play.
4. Ball and Club Data:
- Why it Matters: Comprehensive data on ball speed, launch angle, spin rate, and clubface angle is crucial for diagnosing issues with your shots. Understanding these metrics allows you to make necessary adjustments to optimize your swing, leading to improved performance on the course.
5. Practice Modes:
- Why it Matters: Having various practice modes, such as driving range, chipping, and putting, allows you to focus on specific aspects of your game. These modes help you hone your skills in different areas, ensuring a well-rounded improvement in your golf game.
6. Multiplayer and Online Connectivity:
- Why it Matters: If you enjoy friendly competition or want to play with friends remotely, look for a simulator with multiplayer and online connectivity features. This adds an element of fun and social interaction to your practice sessions, making them more enjoyable and motivating.
7. User-Friendly Interface:
- Why it Matters: A user-friendly interface ensures that you can easily navigate the simulator’s features and settings. It streamlines your practice sessions and eliminates frustration, allowing you to focus on improving your game.
8. Upgradability:
- Why it Matters: Even with a budget-friendly simulator, consider its upgradability. Some low-cost models can be enhanced over time with additional sensors or software updates. This ensures that your simulator can grow with you as your golfing skills and preferences evolve.
DIY Golf Simulator Setup on a Budget
Creating your own budget-friendly golf simulator at home is not only an exciting project but also a practical way to practice your golf game without the need for an expensive setup. Here’s a step-by-step guide to help you get started:
1: Determine Your Space
Identify an area in your home where you can set up your DIY golf simulator. You’ll need enough space for your swing, a screen, and a hitting mat. Garages, spare rooms, or even basements can work well.
2: Gather Your Equipment
To keep costs down, consider the following equipment:
- Launch Monitor: Look for budget-friendly launch monitors like the SkyTrak or OptiShot. These devices measure ball flight data and connect to your computer or smartphone for analysis.
- Projector: If you want a larger screen experience, find an affordable projector that can display your virtual golf course. Make sure it’s compatible with your launch monitor and computer.
- Impact Screen: You can purchase an impact screen or create one yourself using blackout cloth or a white bedsheet. Ensure it’s large enough to provide an immersive experience.
- Hitting Mat: Invest in a good-quality hitting mat that mimics the feel of a real fairway. It should be large enough to accommodate your stance.
- Computer: You’ll need a computer to run the golf simulator software. A budget-friendly laptop or desktop with the required specifications should suffice.
- Golf Simulator Software: Consider software options like The Golf Club or WGT Golf. Some launch monitors come with their own software.
3: Set Up the Space
- Position the launch monitor at an appropriate distance from your hitting area according to the manufacturer’s guidelines. Ensure it’s securely fixed.
- Set up your projector and screen at a distance that allows for a comfortable and immersive experience.
- Place the hitting mat in front of the screen, making sure it’s level and secure.
4: Connect Everything
- Connect your launch monitor to your computer or smartphone and ensure they communicate correctly. Install any necessary software and updates.
- Connect the projector to your computer and adjust the display settings to project accurately onto the screen.
5: Calibrate and Test
- Calibrate your launch monitor according to the manufacturer’s instructions. This step ensures accurate data readings.
- Test your setup by hitting a few shots. Make adjustments to the screen, projector, and launch monitor placement as needed to ensure everything functions smoothly.
Step 6: Fine-Tune Your Setup
- Experiment with screen size, projection distance, and launch monitor positioning until you achieve the desired experience.
Step 7: Enjoy Your DIY Golf Simulator
Now that your DIY golf simulator is up and running, you can enjoy virtual rounds of golf, practice your swing, and improve your skills from the comfort of your home, all without breaking the bank. Regularly update your software and maintain your equipment to keep your setup in top condition.
Creating a budget-friendly golf simulator is a rewarding project that can provide hours of entertainment and help you enhance your golf game without the need for an extravagant investment.
Accessories and Upgrades to Enhance Your Golf Simulator Experience
Enhancing your golf simulator setup with budget-friendly accessories and upgrades can take your virtual golfing experience to the next level. Here are some essential accessories and upgrades along with recommendations for cost-effective options:
**1. Hitting Mat:
- Why it Matters: A quality hitting mat provides a realistic surface to strike the ball from, enhancing your practice sessions.
- Budget-Friendly Option: Consider the “Real Feel Golf Mats” or “Rukket Tri-Turf Golf Hitting Mat” for affordable and durable options.
2. Netting and Enclosures:
- Why it Matters: Netting and enclosures ensure that mishit shots don’t damage your surroundings and provide a safe environment for practice.
- Budget-Friendly Option: “Rukket Pop-Up Golf Net” or “Callaway Tri-Ball Hitting Net” offer affordable and reliable options for containing your shots.
3. Lighting:
- Why it Matters: Adequate lighting is crucial for tracking the ball’s flight and analyzing your shots accurately.
- Budget-Friendly Option: LED shop lights or clip-on work lights can provide cost-effective lighting solutions for your simulator space.
4. Additional Launch Monitor Features:
- Why it Matters: Upgrading your launch monitor can provide more advanced shot data, enhancing your understanding of your swing.
- Budget-Friendly Option: If your launch monitor supports it, consider purchasing add-on features or software upgrades for more in-depth analysis.
5. Floor Mat or Turf:
- Why it Matters: A comfortable and durable surface underfoot can improve your overall experience during extended practice sessions.
- Budget-Friendly Option: Foam puzzle mats or artificial turf rolls are affordable choices for creating a comfortable flooring.
6. Tablet or Smartphone Holder:
- Why it Matters: Mounting your device at eye level makes it easier to view swing analysis data during practice.
- Budget-Friendly Option: Look for universal adjustable holders that can attach to your simulator setup.
7. Impact Screen Upgrades:
- Why it Matters: If you’re using a DIY screen, consider upgrading to a more durable and wrinkle-free material for better image quality.
- Budget-Friendly Option: You can often find budget-friendly screen materials at fabric stores or online retailers.
8. Sound System:
- Why it Matters: Adding a sound system can make your simulator experience more immersive by replicating the sounds of a real golf course.
- Budget-Friendly Option: Affordable Bluetooth speakers or soundbars can provide quality audio without breaking the bank.
9. Turf Tee Mat:
- Why it Matters: If your hitting mat doesn’t have a built-in tee, consider a turf tee mat to simulate different tee heights.
- Budget-Friendly Option: Look for tee mats that are adjustable and come with rubber tees for versatility.
By carefully selecting these accessories and upgrades, you can enhance your golf simulator experience on a budget. Remember to read product reviews, compare prices, and take advantage of discounts and sales to get the most value out of your investments. With these additions, your home golf simulator will become an even more enjoyable and effective practice space.
Maintenance and Care for Your Budget Golf Simulator
Maintaining and caring for your budget-friendly golf simulator is essential to ensure its longevity and consistent performance. Here’s a guide on how to keep your setup in top condition and troubleshoot common issues:
Regular Cleaning:
- Dust and debris: Clean the hitting mat, projector lens, and screen regularly to prevent dust and debris buildup. Use a soft, lint-free cloth or microfiber towel for cleaning.
Environmental Considerations:
- Temperature and humidity: Keep your simulator space within a suitable temperature and humidity range to prevent equipment damage. Avoid extreme cold or hot conditions.
- Ventilation: Ensure proper ventilation to prevent overheating of electronic components, especially the launch monitor and computer.
Protection and Storage:
- Netting and enclosures: Check the netting and enclosures for any wear or damage. Repair or replace damaged parts promptly to maintain safety during practice.
- Impact screen: If you’re using a DIY impact screen, fold and store it properly when not in use to prevent wrinkles and damage.
- Cables and connections: Inspect cables and connectors for wear and tear. Replace any damaged cables to maintain reliable connections.
Software Updates:
- Regularly update your simulator software: Stay up-to-date with the latest software updates and patches. These updates often include performance improvements and bug fixes.
Troubleshooting Common Issues:
Here are some common issues you might encounter and troubleshooting tips:
- No Signal or Connection Issues:
- Check all cable connections, ensuring they are securely plugged in.
- Restart the launch monitor, computer, and projector.
- Update drivers and software for your launch monitor and projector.
- Inaccurate Data Readings:
- Ensure that the launch monitor is correctly calibrated according to the manufacturer’s instructions.
- Verify that the hitting mat and launch monitor are aligned properly.
- Clean the launch monitor’s sensors and lenses regularly to maintain accuracy.
- Screen Wrinkles or Damage:
- Carefully store your impact screen when not in use to prevent wrinkles.
- Gently iron out wrinkles in the screen material using a low heat setting and a cloth or parchment paper to protect the screen.
- Projector Issues:
- Check the projector’s lamp life and replace it if necessary.
- Adjust the projector’s focus, brightness, and contrast settings to optimize image quality.
- Keep the projector’s air filter clean by following the manufacturer’s maintenance recommendations.
- Audio Problems:
- Ensure all audio connections are secure.
- Adjust the volume and settings on your computer or sound system.
- Check for muted or disabled audio options in the simulator software.
By following these maintenance and troubleshooting tips, you can extend the life of your budget golf simulator and enjoy uninterrupted practice and play. Regular care and attention to detail will help you get the most value from your setup while minimizing downtime due to technical issues.
FAQ:
How to get awesome golf simulator for free?
Acquiring an awesome golf simulator for free is an extremely rare and unlikely scenario due to the high cost of golf simulator technology. These systems incorporate advanced sensors, projectors, screens, and software, making them expensive investments. However, if you’re determined to minimize costs, you can explore alternative options such as contests, sponsorships, or partnerships with local golf courses.
One approach is to keep an eye out for contests and giveaways organized by golf simulator manufacturers, golf magazines, or online communities. While winning a golf simulator is a long shot, it’s not entirely impossible.
Another avenue to explore is seeking sponsorship from local businesses or golf-related companies. They may be open to providing a simulator in exchange for advertising or promotional opportunities, reducing your financial burden.
Additionally, consider forming partnerships with local golf courses. Some courses offer simulators for members’ practice and training. By becoming a loyal member, you may gain access to these simulators at discounted rates or even for free.
While free golf simulators are exceedingly rare, it’s worth exploring creative solutions like trade or barter, DIY projects, or renting when searching for cost-effective alternatives. Be cautious and ensure the legitimacy of any offers you encounter. Keep in mind that even if you acquire a simulator at a reduced cost, you may still incur expenses related to setup, maintenance, and space requirements.
What is the best golf simulator projector under $1000?
The best golf simulator projector under $1000 is the Optoma EH200ST. It’s a short-throw projector, which means it can cast a large image from a short distance. This is ideal for golf simulators, where you need to be able to swing your club without hitting the projector.
The EH200ST has a brightness of 3000 lumens, which is enough to produce a clear and bright image even in well-lit rooms. It also has a resolution of 1920×1080 pixels, which is great for displaying golf simulator software.
How much does a full TrackMan simulator cost?
The cost of a full TrackMan simulator can vary depending on a number of factors, such as the size of the enclosure, the type of screen, and any additional features you choose. However, you can expect to spend between $21,000 and $100,000on a complete system.
Why is TrackMan so expensive?
TrackMan is a Danish company that produces golf launch monitors and simulators. TrackMan products are known for their extreme accuracy and reliability, but they are also very expensive. There are a number of reasons for this, including the use of cutting-edge technology, high-quality components, manufacturing costs, and research and development.
Whether or not TrackMan is worth the investment depends on your individual needs and budget. If you are a serious golfer who wants to improve your game, then a TrackMan simulator can be a valuable tool. However, if you are a casual golfer or you are on a tight budget, then there are other golf simulators on the market that may be a better fit for you.
Wrap-Up.
In the world of budget-friendly golf simulators, there’s something for everyone. These affordable options may not have all the fancy features, but they deliver real golfing fun without the hefty price tag.
From simple screens to DIY setups, you can find a budget-friendly simulator that suits your style. They offer essential features for practice and enjoyment, like swing analysis and various courses to play.
Accessories like hitting mats and nets can make your setup even better, and regular care ensures it lasts. While free simulators are super rare, you can get creative with partnerships and contests to cut costs.
In the end, budget golf simulators let you play, practice, and have fun without spending a fortune. So, tee up and enjoy the game, all from the comfort of your home!
When it comes to cleaning, start by turning off and unplugging your headphones or earbuds. Avoid using excess moisture and abrasive materials. A microfiber cloth is excellent for gentle cleaning. For deep cleaning, use a soft brush or a can of compressed air to remove dirt and debris.
Avoid submerging them in water or using harsh chemicals to clean. It’s also essential to clean them regularly, at least once a week if used daily, to prevent the buildup of earwax and bacteria.